
I like simple. Simple is my friend.
Back in the days before Lightroom, I used Photoshop for all my post-processing and retouching needs. It was robust. It was limitless. It was without peer.
It was not simple.
Anything I wanted to do often involved multiple layers and various filters or adjustments working in tandem. Even though I’d been using Photoshop for over a decade, it would still sometimes take a lot of work to achieve a simple effect. Then Lightroom came along and changed everything. Combining file management with a solid RAW, it was a one-stop shop for all my post-processing needs. Best of all, it was simple. Overnight, Lightroom became king and Photoshop became the tool I brought out once in a while for more involved retouching. I even avoided taking images into Photoshop after developing them in Lightroom (a common process) simply because Lightroom’s simplicity made Photoshop look positively arcane.
At least, it did. I may be rethinking my stance after playing with the PSKiss Toolkits.
Tooling Around
The PSKiss Toolkits are sets of script-based adjustments for Photoshop CS5+, all wrapped up in neat little sliders. No curves to monitor, no numerical values to assign, no masks and selections. Just grab the slider and move it around until you like what you see. Simple.
There are three toolkits available either as a group or individually—Portrait, Outdoor, and Product—each intended to help punch up different types of photos. I got a chance to play with all three and will have more on the results of my tinkering shortly enough.
 Setup is a relatively painless affair, the plugin showing up in your Photoshop workspace as a panel not unlike the one to the left. Each button opens up a slider dialogue that lets you tweak different visual elements. The button titles can be a little vague at times, but each has a helpful tooltip that pops up if you hover your mouse over a button.
One nice aspect to the suite is that each adjustment you make is rendered on a new layer, leaving the original layer untouched in case you change your mind. This also gives you the ability to fade the adjustment by way of the layer opacity or, likewise, mask various bits of the adjustment. You could, for example, run a Wise Sharp filter on your image then use a mask to ensure that only certain areas of the image are sharpened. The panel also helpfully offers merge options to keep the layers manageable (they can add up after a while).
 On the topic of multiple layers, one thing worth pointing out is that every new layer is built off of the one below, which means that if you run multiple filters in a row, you will wind up with a sort of “pyramid” of adjustments, rather than a stack. On the layers to the right, for example, the first layer is just for Density Build, but the second one actually contains the Density Build and the Pop-Out filters. By extension, the top layer (“Look Factory”) actually contains all the filters that have been run on the image so far. This is important to know if you decide later on that you want to fade out the filter you ran three steps ago.
Samples
Below are three side-by-sides of photos that I gave the PSKiss treatment, and I have to say that each was an improvement. I’ll talk about each in turn, but it should be mentioned that every image I used was one that I had considered “finished.” They had been developed and retouched in Lightroom to a level with which I was very satisfied.
At least, until I saw how much further I could have taken them so easily.
Product: Jeweler, High Key, and Edge filters


Outdoor: Sky Boost, Sky Density, Punch, Balance, and Clarte


Portrait: Density Build, Pop-Out, Clarte, and Face Sharp


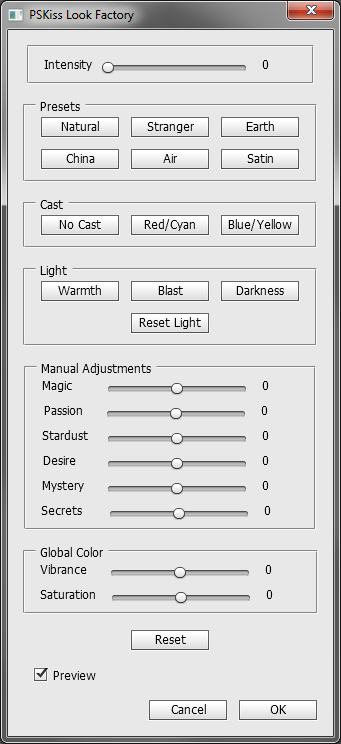
The best part of the Portrait toolkit, however, is by far the Look Factory. A sort of “Preset Hub,” it provides a suite of features and options that allow you to easily apply various looks to your image. Better still, the Intensity slider lets you fade the effect for greater control. Sadly, the best part of the toolkit is also the weakest. The Manual Adjustment sliders have frustratingly vague names and, unlike the other toolkits, there are no tooltips provided for the Look Factory. Using the tool is a lot of fumbling around in the dark, using trial-and-error as your guide. Tooltips or even an accompanying ReadMe file would offer much in the way of demystifying the tool. The PS Kiss website does offer a brief guide on their Tutorial Page, but it’d be nice to see something integrated into the plugin.
Wrap-Up
As with my last review, the question once again boils down to: is it worth it?
Unlike the PSKiss Skin & Scenery Color profile pack, however, this is a question you can answer for yourself. PSKiss offers trial versions of the plugins, with the limitation being that you can only use them on images under 640px, which is big enough to let you play and draw your own conclusions.
I will say that I think it’s a great tool for photographers who specialize in the relevant fields. I’d readily drop the $25 for the Portrait Toolkit, for example, but I doubt I’d find enough use in the Product or Outdoor ones to justify the expense. But again, don’t take my word for it. Head over to the PSKiss Shop and take them for a test drive yourself.